It's time to post the first tutorial on this blog: controlling a Lego Mindstorms NXT robot (but the code would also work for any other differential drive robot supported by MSRS, including the BASIC Stamp-based BOE-bot from Parallax, the iRobot Create, etc.) with a Nintendo wiimote (if you're not yet an expert: the WII controller) using Microsoft Robotics Studio (MSRS) 1.5. I wrote an introduction to this in my first post, and the time has come to write a tutorial about it! I'm also going to introduce you to writing services with Microsoft Robotics Studio.
Update: You can download a project for Microsoft Robotics Developer Studio 2008 here (read the readme first). Most of the tutorial is still compatible with the new version, so there shouldn’t be any problems following it.
Creating a service
A service is a fundamental concept in MSRS. A service can represent many different things in MSRS:
- First, every application you write with MSRS is a service by itself
- The code which allows communication with a robot is a service. It’s sometimes called ‘BrickService’ and it sends motor data/receives sensor data using the appropriate communication protocol (e.g. the PC communicates with the NXT via Bluetooth and sends/gets data in a specific way)
- The ‘generic contracts’ are services that allow you to handle specific parts of a robot, like motors, a differential drive system, different sensors, cameras. These services are the same for whatever robot you are using. That allows you to run the exact same program with different robots (for which the contracts you’re using are available) or even in simulation.
- You can even write a service for a specific behavior, so that you could use that service in another application without having to write the whole thing again. (a good example would be the Robotics Tutorial 3 - Creating Reusable Orchestration Services on msdn)
- Any other piece of code for MSRS…
A service is always communicating with other services: sending requests (e.g. telling the drive service to go forward at 50% speed for the left and right motors), and receiving notifications from another service to which you have subscribed (for example, a bumper service would send a notification when the bumper was pressed or released, or the wiimote service would send notifications when the state is changed, i.e. when the accelerometer or a button changes state).
So after this brief intro about the structure of an application, let’s start by creating a service!
To do this, you need to open the MSRS command prompt (this is an important tool in MSRS), found by navigating from the start menu. It’s nothing more than a console window waiting for you to write commands. The command you need to create a service is dssnewservice, followed by a set of parameters. The only parameter you really need for now is /service: (or just /s:), where you specify the name of the service you want to create (others include the programming language, the namespace, etc.). So let's create a wiimoteNxt service:
dssnewservice /s:wiimoteNxt
This creates a folder 'wiimoteNxt' in the C:\Microsoft Robotics Studio (1.5)\ directory (or wherever you installed MSRS 1.5). Navigate to it, and open the wiimoteNxt.sln solution file with Visual C# express or any other version of Visual C#/Visual Studio you have. And there's the project of you service!
Adding references
The next thing we need to do is to add references to our project, so that we can use what we need to use: a drive service, and Brain Peek's WiimoteLib service.
Update: For the next part, note that I provided the necessary wiimoteLib files with the MRDS 2008 version of the project, so you won’t need to migrate the project, although downloading wiimoteLib can be useful for additional stuff.
First, let's set up the WiimoteLib service, so that we can use it in our project. If you haven't downloaded it yet, you can get it here (get the version with the source code). After extracting, you can see a few folders. The folder for the MSRS service is WiimoteCS\WiimoteMSRS, but the problem is that it was written for MSRS 1.0, not 1.5 (Update: the new versions of wiimoteLib are written for MSRS 1.5, so you shouldn’t need to migrate the project, but you still do need to build it). Fortunately, MSRS 1.5 has a nice tool to convert existing services prior to 1.5 to 1.5: the dssProjectMigration tool. To convert the service, just type the following command in the Console, with the appropriate path:
dssProjectMigration "D:\wiimote\291133_WiimoteLib\WiimoteCS\WiimoteMSRS"
Once you've done this, you can compile the service, which is now 1.5 compatible. To do this, open the Wiimote.sln file, then Build->Build Wiimote, then close the solution.
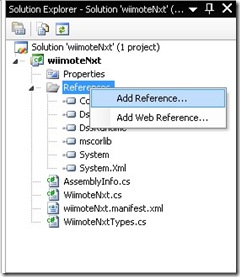
Now that we have compiled the WiimoteLib service, we are going to be able to use it in our wiimoteNxt service. Now we have to add the references: right click on 'References' in the Solution Explorer, and click 'Add Reference...', as shown:
In the window that pops up, select the "Wiimote.Y2007.M06.Proxy" reference, which corresponds to the service you've just built, in the .NET tab (every time you'll want to add a reference, you'll have to choose the component ending with .Proxy; the others have other purposes):
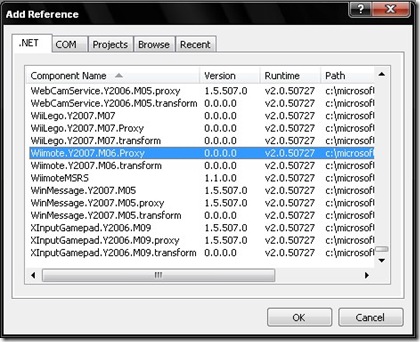
Also add the RoboticsCommon.Proxy reference. That's where the drive service is.
Next, we'll have to add using directives in our main .cs file, so that we won't need to type Microsoft.Robotics.Services.Drive.Proxy.something, but only drive.something. Add the following code at the top of WiimoteNxt.cs, after the other using directives:
using wiimote = WiimoteLib.Proxy;
using drive = Microsoft.Robotics.Services.Drive.Proxy;
Now we're all set! We can finally start to write something interesting!
Subscribing to the wiimote
In order to get notifications from the wiimote (i.e. acceleration data for us), we have to subscribe to its service. This allows the wiimote service to know that it will have to send us notifications, each time a change occurred.
When you subscribe to a service, that service will send messages with the notifications, therefore, our service will need something to receive those messages, in a sort of stack that holds those messages. In MSRS, this is called a Port. Every service has its own port, usually defined as "Operations", which gives us access to the service.
To specify that the two services are going to communicate, we'll need to add a Partner attribute before declaring the ports (attributes are an advanced feature of C#.NET, which I won't cover, but be aware that it's just a way to tell the runtime environment something about what is running. For instance, MSRS uses that information during runtime to show which services are running, what they subscribe to, etc. on a browser). The wiimote and drive services are called Partner services.
For the wiimote, we will need to declare two ports: one is the main wiimote port, declared with a Partner attribute, and the other is a notification port, which is used to receive notifications and handle them. The parameters of the Partner attribute are:
- The name identifying the partner (this name will appear on the web browser, for instance)
- The ID of the service (a complicated string belonging to the service), accessed with: serviceProxy.Contract.Identifier
- The creation policy of the partner. This tells if a new instance of the service should be created or not (for instance, the wiimote data is the same everywhere, so you could use the same instance in different services; whereas a behavior service is different for different robots, so you should create a new instance in different services). Here we will be using PartnerCreationPolicy.UseExistingOrCreate, which means that if there already is an instance, we'll use that one, otherwise, we'll create a new one.
Now copy this code after the _mainPort declaration, in the same file.
//the wiimote port (with the appropriate Partner attribute)
[Partner("wiimote", Contract = wiimote.Contract.Identifier, CreationPolicy = PartnerCreationPolicy.UseExistingOrCreate)]
private wiimote.WiimoteOperations _wiiPort = new wiimote.WiimoteOperations();

//the wiimote notification port
private wiimote.WiimoteOperations _wiiNotify = new wiimote.WiimoteOperations();
Now that we have got the ports, we need to subscribe to the wiimote service. In order to do that, the main wiimote port has to subscribe to the notification port, so that it will get the notifications from it. Add the following line of code in the Start() function, after base.Start():
_wiiPort.Subscribe(_wiiNotify);
Then, we have to start receiving notifications from the wiimote. That is, you need to activate a receiver, which will receive wiimote.WiimoteChanged messages from the _wiiNotify port, and go on receiving forever. This sentence translates into the following code, which follows the previous line (true stands for 'forever', whereas false would be 'just once'):
Activate(
Arbiter.Receive<wiimote.WiimoteChanged>(true, _wiiNotify, wiimoteChangedHandler)
);
Notice that the last argument is 'wiimoteChangedHandler'. That's a handler we haven't declared yet, which will be executed each time a new wiimote.WiimoteChanged message comes in, with that message as an argument to the handler. So let's declare that! (you can add it after the GetHandler):
//wiimote notifications handler
void wiimoteChangedHandler(wiimote.WiimoteChanged wiimoteChanged)
{
}
We are ready to send requests to the motors!
Sending requests to the motors
Now that we have a handler for the wiimote state changes, we only need to send the appropriate requests to the NXT motors.
First, let's add the using directive:
using drive = Microsoft.Robotics.Services.Drive.Proxy;
Then the Partner drive port:
//The drive port with its Partner attribute
[Partner("drive", Contract = drive.Contract.Identifier, CreationPolicy = PartnerCreationPolicy.UseExistingOrCreate)]
private drive.DriveOperations _drivePort = new drive.DriveOperations();
Now, in the wiimote handler, we'll have to send the drive requests to the motors. You can set up the request with the drive.SetDrivePowerRequest class, and then send it with the _drivePort.SetDrivePower() function. Here is the updated handler, with comments:
void wiimoteChangedHandler(wiimote.WiimoteChanged wiimoteChanged)
{
//swap some variables to use the wiimote horizontally (float between -1.0f and 1.0f)
float x = -wiimoteChanged.Body.AccelState.Values.Y;
float y = wiimoteChanged.Body.AccelState.Values.X;
//create a drive request
//(if you prefer, there is a constructor that allows you to set the speeds directly):
//drive.SetDrivePowerRequest request = new drive.SetDrivePowerRequest(leftSpeed, rightSpeed);
drive.SetDrivePowerRequest request = new drive.SetDrivePowerRequest();
request.LeftWheelPower = y + x;
request.RightWheelPower = y - x;
//OR (if you feel uncomfortable with the way it's going backwards)
//if (y > 0)
//{
// request.LeftWheelPower = y + x;
// request.RightWheelPower = y - x;
//}
//else
//{
// request.LeftWheelPower = y - x;
// request.RightWheelPower = y + x;
//}
_drivePort.SetDrivePower(request); //send the request to the drive port
}
And that's it!
Running the service
Before running the program, we have to specify a manifest file, that tells MSRS which robot to use (in this case, we only need a robot that supports the drive service, which is most of the mobile robot), or even run in simulation.
If you want to run the service from within Visual Studio (and debug the program), you have to change the command line arguments in the Properties (either from the Solution Explorer, or Project->Properties), Debug tab.
Here are a few manifests to add at the end of the 'Command line arguments' textbox:
- Lego NXT robot (Tribot or any other custom differential drive robot): "samples\config\LEGO.NXT.TriBot.manifest.xml"
- Tribot in simulation: "samples\config\LEGO.NXT.TriBot.simulation.manifest.xml"
- BOE-Bot: "samples\config\Parallax.BoeBot.Drive.manifest.xml"
- iRobot: "samples\config\iRobot.manifest.xml"
- iRobot Create in simulation: "samples\config\IRobot.Create.Simulation.xml"
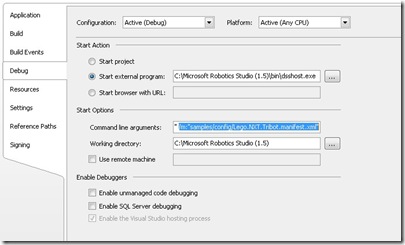
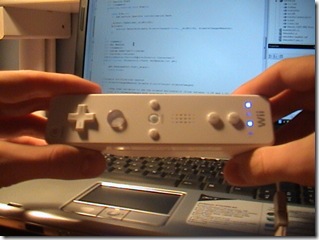
Then, after connecting the robot and the wiimote to the PC (I use BlueSoleil on the PC, which works great compared to the original drivers I had. The wiimote didn't work before, now it does with BlueSoleil, so you might want to try it if you have any problems), debug the program (press green arrow button, or F5), and...there you go!!! (hold the wiimote as shown)
Another way to run the service without opening Visual Studio is through the MSRS Command Prompt, with the following command:
dsshost -port:50000 -tcpport:50001 -manifest:"wiimoteNxt/wiimoteNxt.manifest.xml" -m:"samples/config/Lego.NXT.Tribot.manifest.xml"
(note that m is short for manifest, and -m: and /m: are the same)
Change the paths of the manifests, if needed (the first one is the service's manifest, and the second is the robot's one), get ready, and have fun!
Finally, here's a video:
If you need any help with connecting and initializing your robot, or anything else about MSRS, check the MSRS documentation (online, or in chm format in the installation folder).
You can download the project here (extract it in the MSRS 1.5 directory)
You can get the MRDS 2008 version here (read the readme.txt first)


