March 11, 2008

Studying physics with XNA

The past two weeks, I was in holiday, the usual 2-week holiday we have in France a few times a year. I had to study physics for school, and it was almost all about "balistique", which is basically finding the equation of an object's movement once you know its initial state and the forces acting on it, thanks to Newton's second law. Since studying that only on paper wouldn't be fun, I wanted to actually simulate the movements in a 3D environment, to see it more realistically.


Capture


Intro to XNA

I had recently discovered XNA, Microsoft's 'new' 3D graphics framework, which makes it a lot easier than DirectX to write 3D games/programs. I've been doing some DirectX previously, and boy I can tell you how cool it is not to care about creating Direct3D devices, pixel formats, present parameters, and all that low-level stuff which is mostly for professional game developers, and focus directly on much higher level things, after Visual Studio generates the your main functions.


The C# programming language is also much better, I think, for 3D. The DirectX programming I did was in C++, and since the C++ DirectX API is (almost)the same one as the C one, it has all those weird naming conventions like the IDirect3D9, D3D, D3DX prefixes to every single interface/class/enum/etc which makes the code unpleasant. In XNA, LPDIRECT3DTEXTURE9 becomes Texture. Loading textures and models is done by simply using the (awesome) Content manager (for example, myTexture = Content.Load<Texture>("asteroid.jpg"); ) instead of using something like D3DXCreateTextureFromFile(g_pDevice, "asteroid.jpg", &m_pMyTexture) (notice the frequent use of double pointers, which is required in every function that creates or loads something). The awesome IntelliSense of Visual Studio is surely a lot more convenient (and VERY useful to even find stuff you didn't know) in C# than it is in C++. I know there's a managed DirectX SDK, but since all my books use C++, I've stick to that language (and by the way, I love C++ when it is used the right way).


So basically what I'm saying is that if you want to do some 3D projects (games or not) just for fun, you should use XNA rather than DirectX. If you want to do game development later then you might want to learn DirectX, but actually, once you know XNA, it should be a lot easier to move to DirectX from there than learning it from scratch.


The physics "simulator"

Now let's get back to that physics "simulator", and what's in it.

When you create a new XNA project (a "windows game" template), what you have is a Game class, where you have all the main methods such as Initialize(), Update() and Draw().


Then I wrote a 'Solid' class, which represents a physical object, and contains its physical properties (such as its mass or electrical charge) and some other physical quantities used (gravitational, electric and magnetic fields, a friction value etc.). It also has the current parameters of the object, such as its position in space, it's velocity and acceleration (3D vectors); the update() function is where all the physical/mathematical calculations are done, and the Draw() method simply draws the Model in the right place, using the appropriate World, View and Projection matrices.


The view and projection matrices are taken from the Camera class I wrote, which is a static class representing a First Person Camera in space. it basically computes the view matrix from the user input (arrow keys and mouse, as in an FPS game), and it allows you to move around the scene and not to lose the object from your field of view.

Now let's get to the main piece of code that makes the object move:

   1: //This is where you set the initial state
   2: Vector3 position = new Vector3(0.0f, 10.0f, 0.0f);  //Vector3.Zero;
   3: Vector3 velocity = Vector3.Zero;   //new Vector3(10.0f, 30.0f, 0.0f);
   4: Vector3 acceleration;
   5:  
   6: public virtual void Update(GameTime gameTime)
   7: {
   8:     float dt = (float)gameTime.ElapsedGameTime.Milliseconds / 1000;
   9:     float t = (float)gameTime.TotalGameTime.Milliseconds / 1000;
  10:  
  11:     //---------- Newton's 2nd law -------------
  12:     
  13:     //acceleration = q / m * (E + Vector3.Cross(velocity, B)) - 1.2f * velocity / m;    //electric field + magnetic field + friction
  14:     acceleration = (-k / m * position - h * velocity) / m;                              //oscillator with friction
  15:     //acceleration = (-k / m * position - h * velocity - 50.0f * (float)Math.Cos(0.01f * t) * Vector3.Up) / m;
  16:  
  17:     velocity += acceleration * dt;
  18:     position += velocity * dt;
  19: }

The dt variable is just the time elapsed between two frames, in seconds (converting to seconds makes things easier for physics calculations). Then you have to write the actual expression of the acceleration from Newton's second law. I put it in the Update() method because sometimes acceleration changes with time (that doesn't happen with gravity alone, but it does as soon of you have friction, for instance).

The two following lines are simply doing the job of integrating over time:

since (vectorially), vel = d(pos)/dt and acc= d(vel)/dt, you have to integrate acceleration over time to get velocity, and integrate velocity to get the position.

So this was basically the piece of code which did everything! I've included three types of movement: the first is a charged particle in an electric field and a magnetic field, the second is a damped oscillation, and the third is a forced oscillation (which doesn't simulate very well yet). To change, just comment out the ones you don't want.

If you're wondering what the equation of that weird first trajectory is... Here it is:

IMG_0140

If you wish, I can scan the proof (it's about four pages long, and uses complex numbers =P, but I can do it for you :-)


You can download the project here:

December 22, 2007

Arduino Theremin

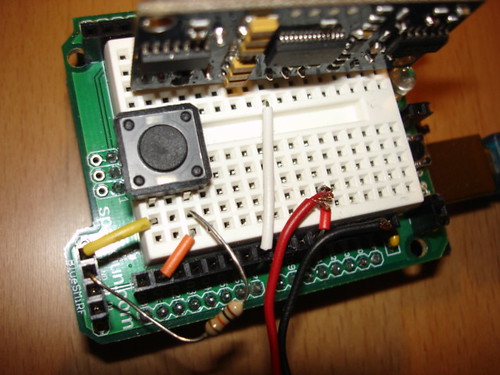
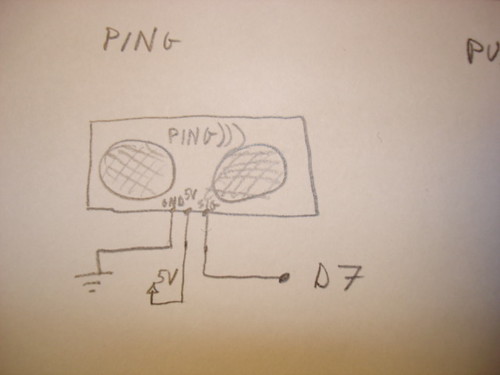
When I got my Arduino protoshield from sparkfun, I wanted to make something cool with it. And since I had seen a few Theremin projects before, and already thought about making some, I finally made one, using the Parallax PING sonar sensor. Here are some informations about how I made it. You can see all the pictures here.


Arduino Theremin


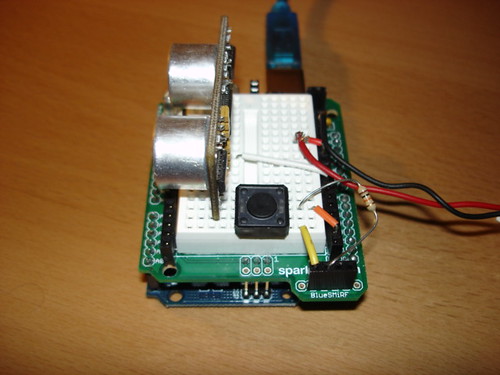
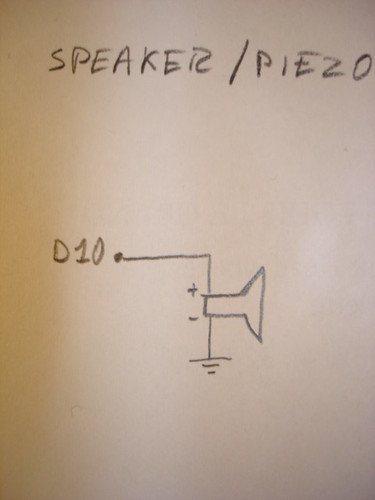
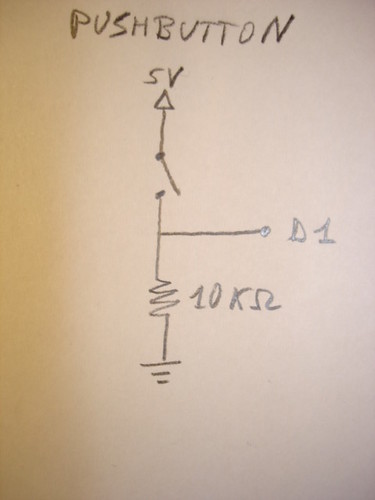
First, the schematics:


Arduino Theremin circuit


Arduino Theremin speaker schematicArduino Theremin pushbutton schematicArduino Theremin Ping schematic


Here's the commented code for the Arduino:

int pingPin = 7;
int buzzPin = 10;
int btnPin = 1;
int val;
 
void setup()
{
  pinMode(buzzPin, OUTPUT);  //set speaker pin to output
  pinMode(btnPin, INPUT);    //set pushbutton pin to input
}
 
int getPing()
{
  //send a 10us pulse to wake up the sonar
  pinMode(pingPin, OUTPUT);
  digitalWrite(pingPin, HIGH);
  delayMicroseconds(10);
  digitalWrite(pingPin, LOW);
  
  //get the raw value from the sonar, corresponding to the
  //actual time of travel of the ultrasound waves
  pinMode(pingPin, INPUT);
  return pulseIn(pingPin, HIGH);  //return this value
}
 
void loop()
{
  if (digitalRead(btnPin) == HIGH)  //only play when the button is pressed
  {
    val = getPing() / 5;  //you can tune the pitch by dividing by a different number
    
    //generate the pulse
    digitalWrite(buzzPin, HIGH);
    delayMicroseconds(val);
    digitalWrite(buzzPin, LOW);
    delayMicroseconds(val);
  }
}


And that's about it! Now you should start to learn how to play it... Kinda hard at the beginning, but that's where the fun begins!

Here are some videos of me playing (jingle bells and tetris). It's also kinda noisy... maybe a better sonar would be better (if you have a different sonar, and manage to make a better 'thereduino', I want to see it!!!). Enjoy (or at least try to :p).


If I improve my skills, I'll post new videos... But I also want to see YOU playing YOUR Arduino Theremin! Feel free to send me an email or write a comment.

December 2, 2007

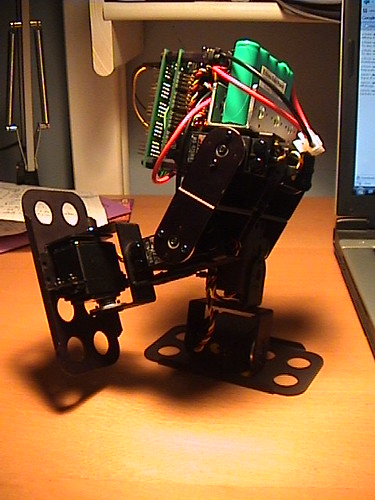
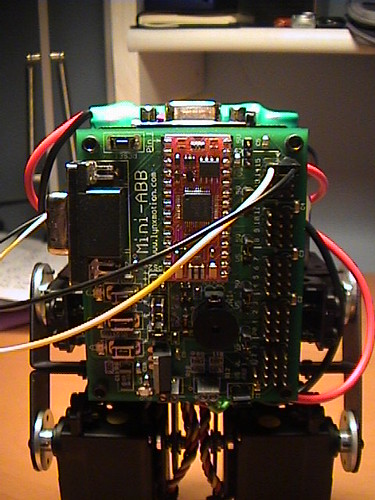
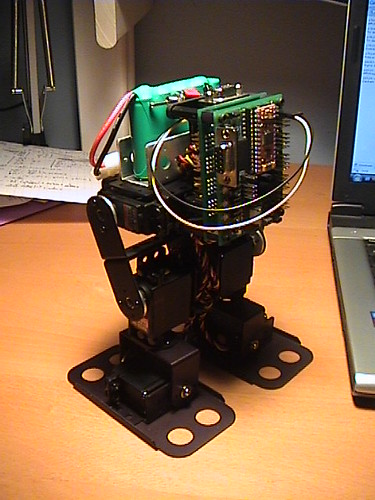
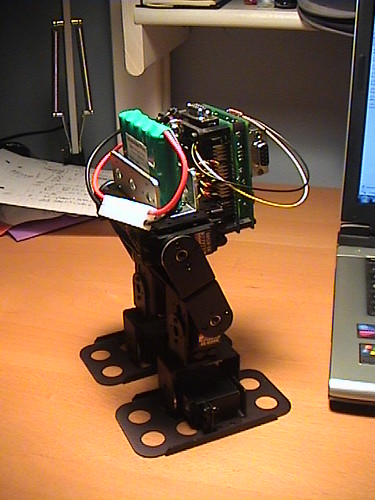
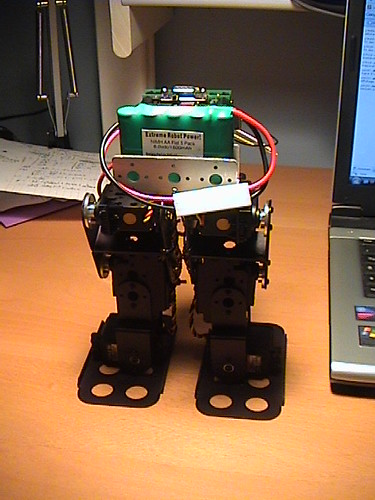
BRAT rebuilt with new servos

This summer, I had bought 6 new Hitec HS-475HB servos from Lynxmotion,  and I just removed the old servos and rebuilt the BRAT yesterday. Of course, it's a lot better than it was with the HS-422 servos...

Here are some photos:

BRAT robot

BRAT robot

BRAT robot

BRAT robot

BRAT robot

And videos (in the second one, the BASIC Atom is sending data to the SSC-32, I'm just using the code generated by the Sequencer program):

As soon as I have time, I'll try to improve the waking sequence, add some other sequences (turn, kick), add some sensors, and make a bit more autonomous.

and sorry for the low quality of photos and videos...

November 17, 2007

Lego NXT + wiimote with MSRS tutorial

It's time to post the first tutorial on this blog: controlling a Lego Mindstorms NXT robot (but the code would also work for any other differential drive robot supported by MSRS, including the BASIC Stamp-based BOE-bot from Parallax, the iRobot Create, etc.) with a Nintendo wiimote (if you're not yet an expert: the WII controller) using Microsoft Robotics Studio (MSRS) 1.5. I wrote an introduction to this in my first post, and the time has come to write a tutorial about it! I'm also going to introduce you to writing services with Microsoft Robotics Studio.

Update: You can download a project for Microsoft Robotics Developer Studio 2008 here (read the readme first). Most of the tutorial is still compatible with the new version, so there shouldn’t be any problems following it.

Creating a service

A service is a fundamental concept in MSRS. A service can represent many different things in MSRS:

  1. First, every application you write with MSRS is a service by itself
  2. The code which allows communication with a robot is a service. It’s sometimes called ‘BrickService’ and it sends motor data/receives sensor data using the appropriate communication protocol (e.g. the PC communicates with the NXT via Bluetooth and sends/gets data in a specific way)
  3. The ‘generic contracts’ are services that allow you to handle specific parts of a robot, like motors, a differential drive system, different sensors, cameras. These services are the same for whatever robot you are using. That allows you to run the exact same program with different robots (for which the contracts you’re using are available) or even in simulation.
  4. You can even write a service for a specific behavior, so that you could use that service in another application without having to write the whole thing again. (a good example would be the Robotics Tutorial 3 - Creating Reusable Orchestration Services on msdn)
  5. Any other piece of code for MSRS…

A service is always communicating with other services: sending requests (e.g. telling the drive service to go forward at 50% speed for the left and right motors), and receiving notifications from another service to which you have subscribed (for example, a bumper service would send a notification when the bumper was pressed or released, or the wiimote service would send notifications when the state is changed, i.e. when the accelerometer or a button changes state).


So after this brief intro about the structure of an application, let’s start by creating a service!

To do this, you need to open the MSRS command prompt (this is an important tool in MSRS), found by navigating from the start menu. It’s nothing more than a console window waiting for you to write commands. The command you need to create a service is dssnewservice, followed by a set of parameters. The only parameter you really need for now is /service: (or just /s:), where you specify the name of the service you want to create (others include the programming language, the namespace, etc.). So let's create a wiimoteNxt service:

dssnewservice /s:wiimoteNxt

This creates a folder 'wiimoteNxt' in the C:\Microsoft Robotics Studio (1.5)\ directory (or wherever you installed MSRS 1.5). Navigate to it, and open the wiimoteNxt.sln solution file with Visual C# express or any other version of Visual C#/Visual Studio you have. And there's the project of you service!

Adding references

The next thing we need to do is to add references to our project, so that we can use what we need to use: a drive service, and Brain Peek's WiimoteLib service.


Update: For the next part, note that I provided the necessary wiimoteLib files with the MRDS 2008 version of the project, so you won’t need to migrate the project, although downloading wiimoteLib can be useful for additional stuff.

First, let's set up the WiimoteLib service, so that we can use it in our project. If you haven't downloaded it yet, you can get it here (get the version with the source code). After extracting, you can see a few folders. The folder for the MSRS service is WiimoteCS\WiimoteMSRS, but the problem is that it was written for MSRS 1.0, not 1.5 (Update: the new versions of wiimoteLib are written for MSRS 1.5, so you shouldn’t need to migrate the project, but you still do need to build it). Fortunately, MSRS 1.5 has a nice tool to convert existing services prior to 1.5 to 1.5: the dssProjectMigration tool. To convert the service, just type the following command in the Console, with the appropriate path:

dssProjectMigration "D:\wiimote\291133_WiimoteLib\WiimoteCS\WiimoteMSRS"

Once you've done this, you can compile the service, which is now 1.5 compatible. To do this, open the Wiimote.sln file, then Build->Build Wiimote, then close the solution.


Now that we have compiled the WiimoteLib service, we are going to be able to use it in our wiimoteNxt service. Now we have to add the references: right click on 'References' in the Solution Explorer, and click 'Add Reference...', as shown:


Capture


In the window that pops up, select the "Wiimote.Y2007.M06.Proxy" reference, which corresponds to the service you've just built, in the .NET tab (every time you'll want to add a reference, you'll have to choose the component ending with .Proxy; the others have other purposes):


Capture


Also add the RoboticsCommon.Proxy reference. That's where the drive service is.

Next, we'll have to add using directives in our main .cs file, so that we won't need to type Microsoft.Robotics.Services.Drive.Proxy.something, but only drive.something. Add the following code at the top of WiimoteNxt.cs, after the other using directives:

using wiimote = WiimoteLib.Proxy;
using drive = Microsoft.Robotics.Services.Drive.Proxy;

Now we're all set! We can finally start to write something interesting!

Subscribing to the wiimote

In order to get notifications from the wiimote (i.e. acceleration data for us), we have to subscribe to its service. This allows the wiimote service to know that it will have to send us notifications, each time a change occurred.


When you subscribe to a service, that service will send messages with the notifications, therefore, our service will need something to receive those messages, in a sort of stack that holds those messages. In MSRS, this is called a Port. Every service has its own port, usually defined as "Operations", which gives us access to the service.


To specify that the two services are going to communicate, we'll need to add a Partner attribute before declaring the ports (attributes are an advanced feature of C#.NET, which I won't cover, but be aware that it's just a way to tell the runtime environment something about what is running. For instance, MSRS uses that information during runtime to show which services are running, what they subscribe to, etc. on a browser). The wiimote and drive services are called Partner services.

For the wiimote, we will need to declare two ports: one is the main wiimote port, declared with a Partner attribute, and the other is a notification port, which is used to receive notifications and handle them. The parameters of the Partner attribute are:

  1. The name identifying the partner (this name will appear on the web browser, for instance)
  2. The ID of the service (a complicated string belonging to the service), accessed with: serviceProxy.Contract.Identifier
  3. The creation policy of the partner. This tells if a new instance of the service should be created or not (for instance, the wiimote data is the same everywhere, so you could use the same instance in different services; whereas a behavior service is different for different robots, so you should create a new instance in different services). Here we will be using PartnerCreationPolicy.UseExistingOrCreate, which means that if there already is an instance, we'll use that one, otherwise, we'll create a new one.

Now copy this code after the _mainPort declaration, in the same file.

//the wiimote port (with the appropriate Partner attribute)
[Partner("wiimote", Contract = wiimote.Contract.Identifier, CreationPolicy = PartnerCreationPolicy.UseExistingOrCreate)]
private wiimote.WiimoteOperations _wiiPort = new wiimote.WiimoteOperations();

//the wiimote notification port
private wiimote.WiimoteOperations _wiiNotify = new wiimote.WiimoteOperations();

Now that we have got the ports, we need to subscribe to the wiimote service. In order to do that, the main wiimote port has to subscribe to the notification port, so that it will get the notifications from it. Add the following line of code in the Start() function, after base.Start():

_wiiPort.Subscribe(_wiiNotify);

Then, we have to start receiving notifications from the wiimote. That is, you need to activate a receiver, which will receive wiimote.WiimoteChanged messages from the _wiiNotify port, and go on receiving forever. This sentence translates into the following code, which follows the previous line (true stands for 'forever', whereas false would be 'just once'):

Activate(
    Arbiter.Receive<wiimote.WiimoteChanged>(true, _wiiNotify, wiimoteChangedHandler)
);

Notice that the last argument is 'wiimoteChangedHandler'. That's a handler we haven't declared yet, which will be executed each time a new wiimote.WiimoteChanged message comes in, with that message as an argument to the handler. So let's declare that! (you can add it after the GetHandler):

//wiimote notifications handler
void wiimoteChangedHandler(wiimote.WiimoteChanged wiimoteChanged)
{
 
}

We are ready to send requests to the motors!

Sending requests to the motors

Now that we have a handler for the wiimote state changes, we only need to send the appropriate requests to the NXT motors.

First, let's add the using directive:

using drive = Microsoft.Robotics.Services.Drive.Proxy;

Then the Partner drive port:

//The drive port with its Partner attribute
[Partner("drive", Contract = drive.Contract.Identifier, CreationPolicy = PartnerCreationPolicy.UseExistingOrCreate)]
private drive.DriveOperations _drivePort = new drive.DriveOperations();

Now, in the wiimote handler, we'll have to send the drive requests to the motors. You can set up the request with the drive.SetDrivePowerRequest class, and then send it with the _drivePort.SetDrivePower() function. Here is the updated handler, with comments:

void wiimoteChangedHandler(wiimote.WiimoteChanged wiimoteChanged)
{
    //swap some variables to use the wiimote horizontally (float between -1.0f and 1.0f)
    float x = -wiimoteChanged.Body.AccelState.Values.Y;
    float y = wiimoteChanged.Body.AccelState.Values.X;
 
    //create a drive request
    //(if you prefer, there is a constructor that allows you to set the speeds directly):
    //drive.SetDrivePowerRequest request = new drive.SetDrivePowerRequest(leftSpeed, rightSpeed);
    drive.SetDrivePowerRequest request = new drive.SetDrivePowerRequest();
    
    request.LeftWheelPower = y + x;
    request.RightWheelPower = y - x;
 
    //OR (if you feel uncomfortable with the way it's going backwards)
    //if (y > 0)
    //{
    //    request.LeftWheelPower = y + x;
    //    request.RightWheelPower = y - x;
    //}
    //else
    //{
    //    request.LeftWheelPower = y - x;
    //    request.RightWheelPower = y + x;
    //}
 
    _drivePort.SetDrivePower(request); //send the request to the drive port
}

And that's it!

Running the service

Before running the program, we have to specify a manifest file, that tells MSRS which robot to use (in this case, we only need a robot that supports the drive service, which is most of the mobile robot), or even run in simulation.


If you want to run the service from within Visual Studio (and debug the program), you have to change the command line arguments in the Properties (either from the Solution Explorer, or Project->Properties), Debug tab.


Here are a few manifests to add at the end of the 'Command line arguments' textbox:

  1. Lego NXT robot (Tribot or any other custom differential drive robot): "samples\config\LEGO.NXT.TriBot.manifest.xml"
  2. Tribot in simulation: "samples\config\LEGO.NXT.TriBot.simulation.manifest.xml"
  3. BOE-Bot: "samples\config\Parallax.BoeBot.Drive.manifest.xml"
  4. iRobot: "samples\config\iRobot.manifest.xml"
  5. iRobot Create in simulation: "samples\config\IRobot.Create.Simulation.xml"

Capture 


DSC00042

Then, after connecting the robot and the wiimote to the PC (I use BlueSoleil on the PC, which works great compared to the original drivers I had. The wiimote didn't work before, now it does with BlueSoleil, so you might want to try it if you have any problems), debug the program (press green arrow button, or F5), and...there you go!!! (hold the wiimote as shown)


Another way to run the service without opening Visual Studio is through the MSRS Command Prompt, with the following command:

dsshost -port:50000 -tcpport:50001 -manifest:"wiimoteNxt/wiimoteNxt.manifest.xml" -m:"samples/config/Lego.NXT.Tribot.manifest.xml"

(note that m is short for manifest, and -m: and /m: are the same)

Change the paths of the manifests, if needed (the first one is the service's manifest, and the second is the robot's one), get ready, and have fun!


Finally, here's a video:


If you need any help with connecting and initializing your robot, or anything else about MSRS, check the MSRS documentation (online, or in chm format in the installation folder).


You can download the project here (extract it in the MSRS 1.5 directory)

You can get the MRDS 2008 version here (read the readme.txt first)


Feel free to leave comments and send emails to alberto.bietti *AT* gmail.com so that I can improve this tutorial.